


In my first blog article, I will not provide a step by step process on how I built a basic react app (they are available all over the internet !!!), rather most of them will be about the thought process that went behind it to build the app, because that’s what matters in coding, the mindset.
Also I will not focus on CSS as the blog will become too long, it will deviate my intention to teach thought process, rather we all know that in CSS, the sky's the limit.
As usual, you create a react app with npx create-react-app {app-name}. And then you clean everything off to start coding.
Since the project is all about creating a note making app, we created a simple beginner-level application in React, where the users can write or create their notes, and they can save their written notes after clicking the save button and the notes will be visible within the note boxes in our UI. Users can also delete their notes by clicking a delete icon on the notes boxes. We can make a functionality such that the users can also search their notes by typing in the search box.
Given the problem statement, first we have to imagine how the the basic layout will be displayed when the site loads.
For me it was like this..
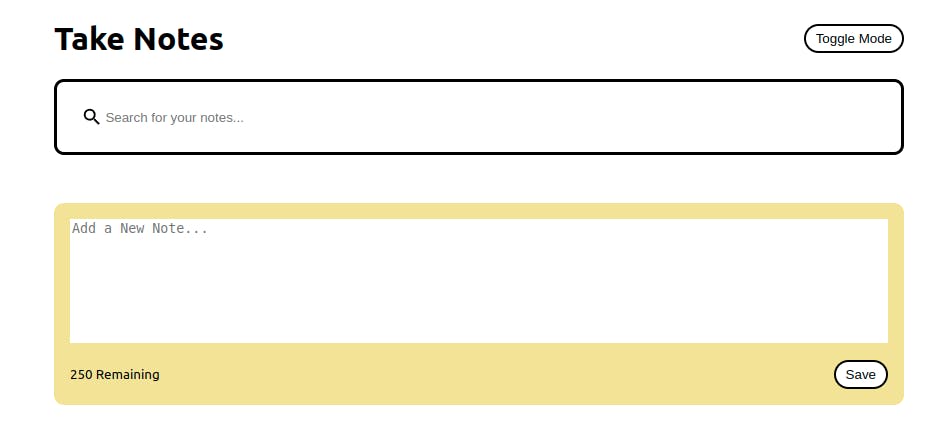
The extra features like word limit and display mode can be added as well
Now we need to think about this in terms of components. Let the header, the search bar, and the input be 3 different components.
function App() {
return (
     <div className="container">
       <Header/>
       <Search/>
       <NotesList/>
     </div>
 );
}
Once we have created this, we need to think that when we input something in a component, and then render that data and the input becomes empty again to get a new value, it’s basically adding the data in a state and then displaying all of it and then updating it again and then displaying all the data along with the data added. And because this variable gets updated and renders accordingly, we make it a state.
const [notes, setNotes] = useState([]);
Now we just need to update this state, and the rendered data will be updated automatically which we will see. Let’s focus on adding data as of now.
Below is how I would write code in NotesList Component
function NotesList() {
 return (
   <div className="notes-list">
     {/* we will render the data here */}
     <AddNote/>
   </div>
 );
}
Yes, we create another component where we will create the input element to input data and then update the state
Inside AddNote Component
function AddNote() {
return (
   <div className="note new">
     <textarea
       cols="10"
       rows="8"
       placeholder="Add a New Note..."
     />
     <div className="note-footer">
       <small>250 Remaining</small>
       <button className="save">
         Save
       </button>
     </div>
   </div>
 );
}
We then create a state here which will get updated when we type something and then we use that state to submit the value in the notes state.
function AddNote({ handleAddNote }) {
 // state which updates as we type something in input
 const [noteText, setNoteText] = useState("");
 // we set the character limit in input element
 const charLimit = 250;
 // this function runs when we make a change input,
 function handleChange(e) {
   // this state updates only when the value is less than charLimit
   if (e.target.value.length <= charLimit) {
     setNoteText(e.target.value);
   }
 }
 // this runs when we submit the input
 // which updates the note state in app component
 // here the note state is brought via props
 // I am not required to show how props work!!!
 function onSubmit() {
   if (noteText.trim().length > 0) {
     handleAddNote(noteText);
     // finally we empty the input
     setNoteText("");
   }
 }
 return (
   <div className="note new">
      {/* here whatever change happens in input,
      it is reflected again in input
      meaning it will stop when characters are more than 250 */}
     <textarea
       cols="10"
       rows="8"
       placeholder="Add a New Note..."
       value={noteText}
       onChange={handleChange}
     />
     <div className="note-footer">
       {/* And this is how the character value decreases when we */}
       {/* type something in input */}
       <small>{charLimit - noteText.length} Remaining</small>
       <button className="save" onClick={onSubmit}>
         Save
       </button>
     </div>
   </div>
 );
}
Now the notes state in app component is updated as follows
 function addNote(text) {
   // date created the moment the data is submitted
   const date = new Date();
   // a object is created to store metadata as well
   const newNote = {
     id: nanoid(),
     text: text,
     date: date.toLocaleDateString(),
   };
   // then we update it by adding newNote as well as previous ones
   const newNotes = [...notes, newNote];
   // now the new data is passed which will update the note state
   setNotes(newNotes);
 }
Using this note state, we pass this notes state via props to
<NotesList handleAddNote={addNote} notes={notes} />
Then in NotesList Component
function NotesList({ handleAddNote, notes }) {
 return (
   <div className="notes-list">
     {/* we will render the data here */}
     {notes.map((note) => {
       return <Note {...note}/>;
     })}
     <AddNote handleAddNote={handleAddNote} />
   </div>
 );
}
Then in Each Note Component
import { MdDeleteForever } from "react-icons/md";

function Note({ id, text, date, handleDelete }) {
 // accessing data via props and then render it
 return (
   <div className="note">
     {/* we render it here */}
     <p>{text}</p>
     <div className="note-footer">
       <small>{date}</small>
       {/* we then use this react-icon to trigger a function
       which will delete this component in the App Component,
       thus deleting that note
       */}
       <MdDeleteForever
         className="delete-icon"
         size="1.3em"
         onClick={() => handleDelete(id)}
       />
     </div>
   </div>
 );
}
In App Component, we work in the triggered deletingNote function where
 function deletingNote(id) {
   // we filter it and store it
   const newNotes = notes.filter((note) => note.id !== id);
   // and then update it, thus rendering updated data
   setNotes(newNotes);
 }
Finally we focus on search functionality
In Search Component
function Search({ setSearchNote }) {
 return (
   <div className="search">
     {/* we add the search icon */}
     <MdSearch className="search-icon" size="1.4em" />
     {/* Here, when there is a change in input,
     there is change in searchNote state */}
     <input
       type="text"
       placeholder="Search for your notes..."
       onChange={(e) => setSearchNote(e.target.value)}
     />
   </div>
 );
}
Then in App Component
     <div className="container">
       <Header handleToggleDarkMode={setDarkMode} />
       <Search setSearchNote={setSearchNote} />
        // as the states updates, so also this filtered value which
        // then is passed via props displaying whatever we
        // searched
       <NotesList
         handleAddNote={addNote}
         notes={notes.filter((note) =>
           note.text.toLowerCase().includes(searchNote.toLowerCase())
         )}
         handleDelete={deletingNote}
       />
     </div>
Finally, we have a basic app which will help us to take notes. You can add features like dark mode by toggling css classes by toggling states respectively or storing the notes in local storage when notes are updated and then displaying the same even when the file is closed and reopened.
Hope this blog article helped you to understand how to think when you are going to build an idea with the help of react. As you can see, even an app which looks complex can be built with the right mindset, so I am confident that it can build yours too. This is Biswas Signing out, Until we meet again.
P.S - In case you are the guy who skipped here. Let me tell you, this article may feel big, but 50% of the time, it is just code. So do check it out.